نوشته شده توسط : lily

Topic: Guide on program 2015- land rover add smart key & all smart keys lost with Lonsdor K518S / Lonsdor K518ISE.

Part 1: Guide on program 2015- land rover add smart key with Lonsdor k518S

Dismantle to read KVM data

Enter Lonsdor service center (u.lonsdor.com) to convert data

Write the new data back to KVM

Add smart key (if OBD doesn’t support this function, please go to “write a workable key” menu to program.)

Note: the converted data is valid for 24 hours, if timed out, please convert it again.

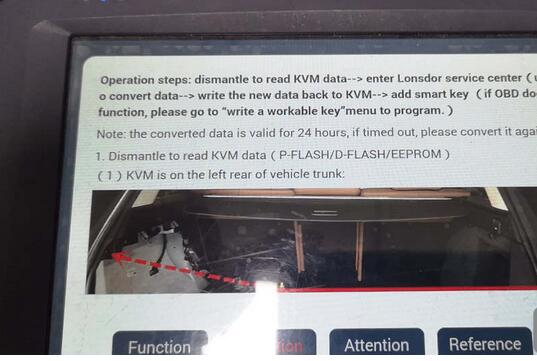
1.Dismantle to read KVM data (P-FLASH/D-FLASH/EEPROM)

1). KVM is on the left rear of vehicle trunk.
lonsdor-k518s-program-2015-land-rover-add-smart-key-1

lonsdor-k518s-program-2015-land-rover-add-smart-key-2
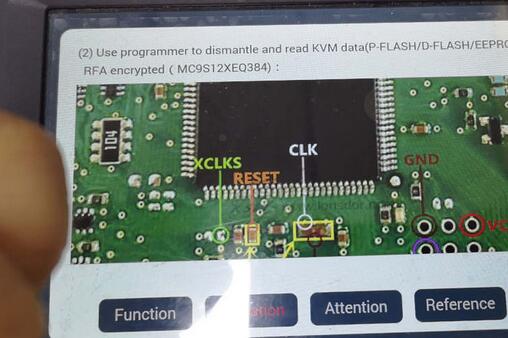
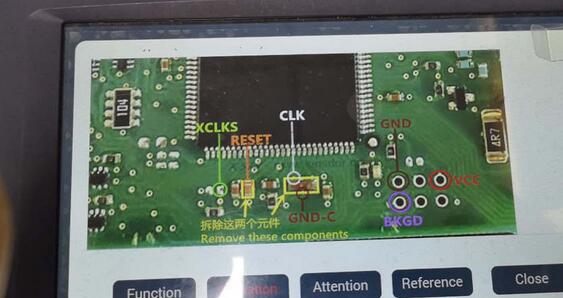
2) Use programmer to dismantle and read KVM data (P-FLASH/D-FLASH/EEPROM) RFA encrypted (MC9S12XEQ384):

lonsdor-k518s-program-2015-land-rover-add-smart-key-3lonsdor-k518s-program-2015-land-rover-add-smart-key-4

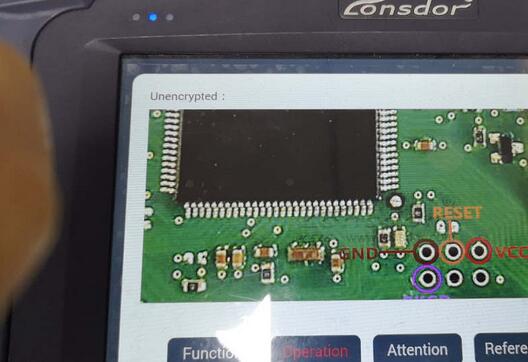
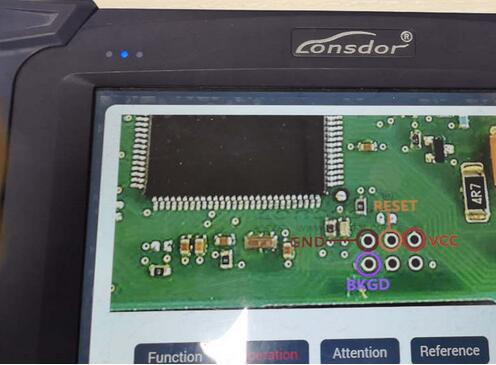
Unencrypted.

lonsdor-k518s-program-2015-land-rover-add-smart-key-5lonsdor-k518s-program-2015-land-rover-add-smart-key-6

2.After reading KVM data, login “Lonsdor service center (U.lonsdor.com)” to convert it. and write the converted data back to KVM and roll back installation. Then you can execute [add smart key] operation.

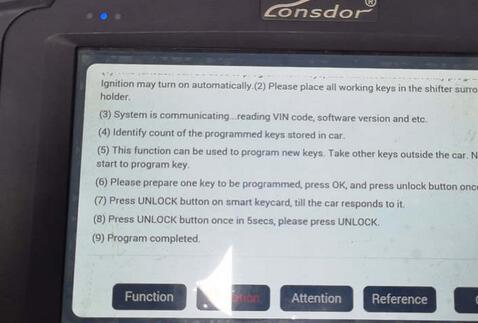
Add smart key

1). This function can be used to program new keys, and will not affect currently programmed keys. Ignition may turn on automatically.

2) Please place all working keys in the shifter surround or cup holder.

3) System is communicating… reading VIN code, software version and etc.

4) Identify count of the programmed keys stored in car.

5) This function can be used to program new keys. Take other keys outside the car. Next step will start to program key.

6) Please prepare one key to be programmed, press OK, and press unlock button once in 5 secs.

7) Press UNLOCK button on smart keycard, till the car responds to it.

8) Press UNLOCK button once in 5 secs, please press UNLOCK.

9) Program completed.

lonsdor-k518s-program-2015-land-rover-add-smart-key-7lonsdor-k518s-program-2015-land-rover-add-smart-key-8

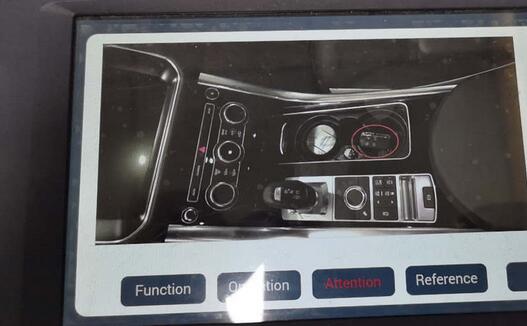
1.The working key will need to be placed in the shifter surround or cup holder (sensor area) in the beginning.

lonsdor-k518s-program-2015-land-rover-add-smart-key-9lonsdor-k518s-program-2015-land-rover-add-smart-key-10
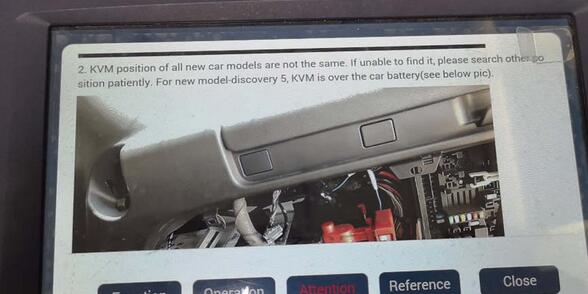
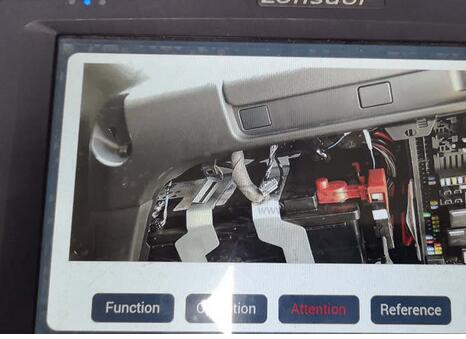
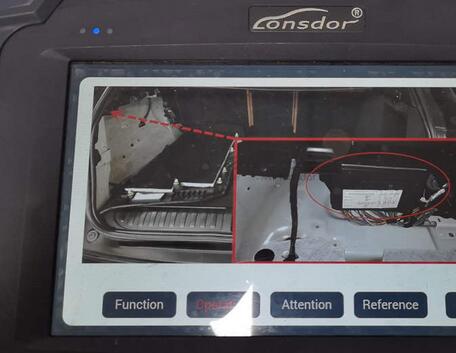
2.KVM position of all new car models are not the same. If unable to find it, please search other position patiently. For new model-discovery 5, KVM is over the car battery (see below pic).

lonsdor-k518s-program-2015-land-rover-add-smart-key-11

lonsdor-k518s-program-2015-land-rover-add-smart-key-12

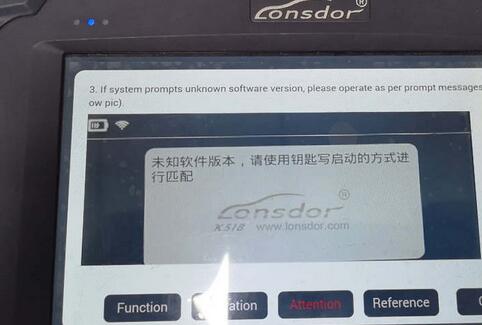
3.If system prompts unknown software version, please operate as per prompt message (see below pic.).

Part 2: Guide on program 2015- land rover all smart keys lost with Lonsdor k518S

Dismantle and read KVM data

import data to K518.customfile

Write a workable key to generate new data

Write the new data back to KVM and reinstall KVM

Verify whether key can work normally.

1.Dismantle and read KVM data (P-FLASH/D-FLASH/EEPROM)

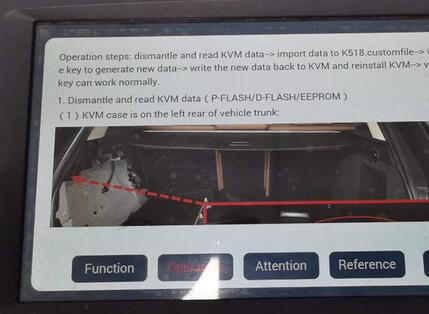
1). KVM case is on the left rear of vehicle trunk.
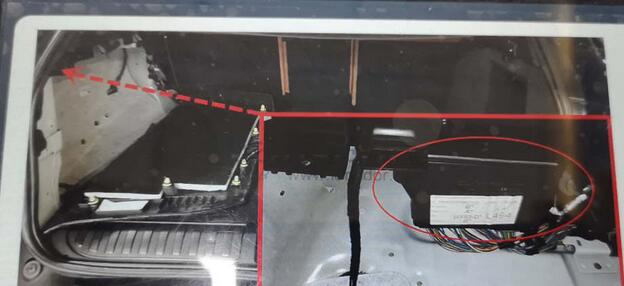
lonsdor-k518s-program-2015-land-rover-add-smart-key-13

lonsdor-k518s-program-2015-land-rover-add-smart-key-14

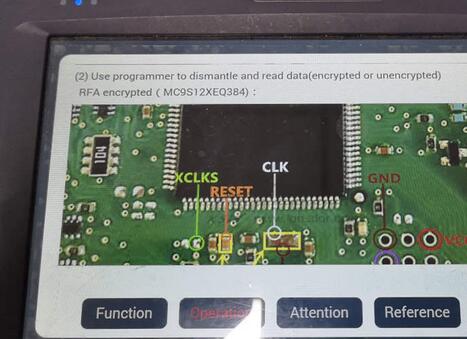
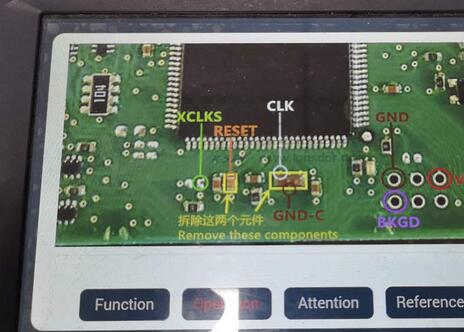
2.Use programmer to dismantle and read data (encrypted or unencrypted)

RFA encrypted (MC9S12XEQ384).
lonsdor-k518s-program-2015-land-rover-add-smart-key-15

lonsdor-k518s-program-2015-land-rover-add-smart-key-16

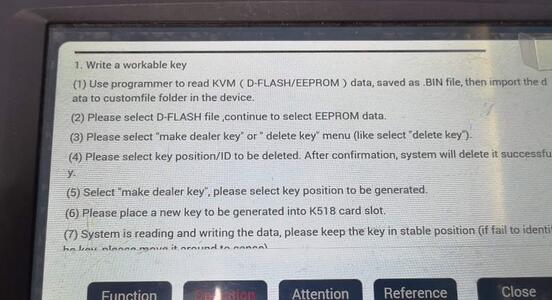
Write a workable key.

1). Use programmer to read KVM (D-FLASH/EEPROM) data, saved as .BIN filed, then import the data to customfile folder in the device.

2). Please select (D-FLASH file, continue to select EEPROM data.

3). Please select “Make dealer key” or “Delete key” menu (like select “delete key”)

4). Please select key position /ID to be deleted. After confirmation, system will delete it successfully.

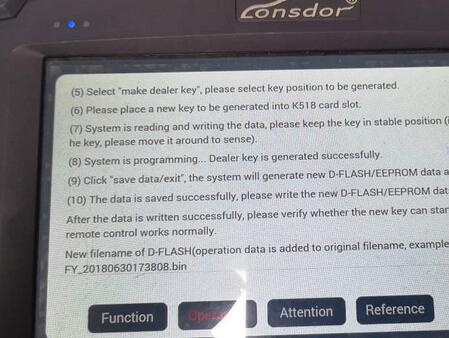
5). Select “Make dealer key”, please select key position to be generated.

6) Please place a new key to be generated into K518 car slot.

7) System is reading and writing the data, please keep the key in stable position (if fail to identify the key, please move it around to sense).

8) System is programming… Dealer key is generated successfully.

9) Click on “Save data / exit”, the system will generate new D-flash /eeprom data and save it.

10) The data is saved successfully, please write the new D-flash/eeprom data to KVM.

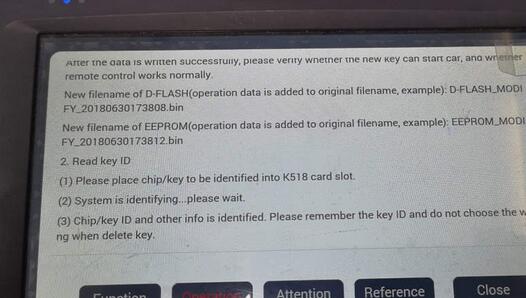
After the data is written successfully, please verify whether the new key can start car, and whether remote control works normally.

New filename of D-flash (operation data is added to original filename, example):D-flash_modify_20180630173808.bin.

After the data is written successful, please verity whether the new Key can start car, and whether remote control works normally.

New filename of D-FLASH(operation data is added to original filename, example): D-FLASH.M0D1 FY.20180630173808.bin

New filename of EEPROM(operation data is added to original filename, example): EEPR0M_M001 FY_20180630173812.bin

Read key ID

(1)    Please place chip/key to be identified into K518 card slot.

(2)    System is identifying…please wait.

(3)    Chip/key ID and other info is identified. Please remember the key ID and do not choose the wrong when delete key.

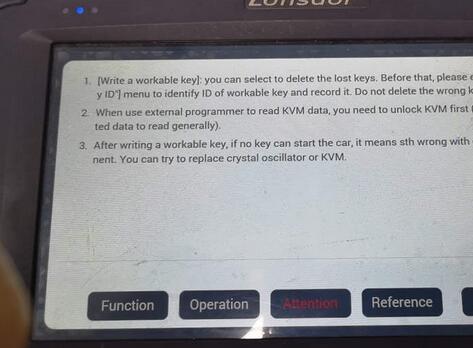
[Write a workable key]: you can select to delete the lost keys. Before that, please enter [Read key ID”] menu to identify ID of workable key and record it. Do not delete the wrong key.
When use external programmer to read KVM data, you need to unlock KVM first (select encryp ted data to read generally).
After writing a workable key, if no key can start the car, it means something wrong with certain component. You can try to replace crystal oscillator or KVM.
lonsdor-k518s-program-2015-land-rover-add-smart-key-17
lonsdor-k518s-program-2015-land-rover-add-smart-key-18
lonsdor-k518s-program-2015-land-rover-add-smart-key-19lonsdor-k518s-program-2015-land-rover-add-smart-key-20lonsdor-k518s-program-2015-land-rover-add-smart-key-21
Thanks.


:: برچسب‌ها: Lonsdor K518S Key Programmer,Lonsdor K518 key programmer,Lonsdor K518S,K518S,K518s key programming tool,K518S key programmer,Key Programming Device,Key Programming tool,Best Programming tool, ,
:: بازدید از این مطلب : 353
|
امتیاز مطلب : 2
|
تعداد امتیازدهندگان : 1
|
مجموع امتیاز : 1
تاریخ انتشار : پنج شنبه 2 آبان 1398 | نظرات ()
نوشته شده توسط : lily

Bought SuperOBD SKP-900 Key Programmer in 2018.09 for my Mazda 2 to do key copy.

Skp900 v3.9 i got:

(i found that, skp 900 v4.0 is cheaper now ( $619 only) when i updated version 3.9 to 4.0)

My Mazda 2 Hatchback:

Two keys:

One original and one for key copy

Here’s what i did.

Start the car

Connect skp900 key programmer to the car

Function: immobilizer

Brand: MAZDA

Auto match pincode

Select Mazda 2 model from list

System: Mazda M2

Choose OBDii adapter and turn the ignition on.

Need 2 keys

Change a new key and turn on

Done!!


:: برچسب‌ها: SKP900,SKP-900,SKP900 Key Programmer,Superobd SKP900,SKP-900 Key Programmer, ,
:: بازدید از این مطلب : 397
|
امتیاز مطلب : 4
|
تعداد امتیازدهندگان : 1
|
مجموع امتیاز : 1
تاریخ انتشار : پنج شنبه 25 مهر 1398 | نظرات ()
نوشته شده توسط : lily

Lost my second key from my e92 335 built in 2007 with CAS3, I already have a blank key. How to create a second key?

Tools to try:

V2014/2015 FVDI: no success
VVDI2 : Success
CGDI/CG Pro: Success

Someone said CG Pro is the cheapest option, make key from dump, only make keys from dump, not OBD! Downgrade with Chinese tools carries significant risk.

A collegue of mine had his CAS bricked by CGDI/CG PRO.

I’ve had a cas3+ bricked by downgrading via OBD with VVDI2.

Just solder on the wires and use file make key.
It takes longer but is much safer.
If you’re good at soldering you’ll have the wires soldered on in 5 minutes or less.


:: برچسب‌ها: CG Pro ,
:: بازدید از این مطلب : 429
|
امتیاز مطلب : 5
|
تعداد امتیازدهندگان : 1
|
مجموع امتیاز : 1
تاریخ انتشار : شنبه 6 مهر 1398 | نظرات ()
نوشته شده توسط : lily


Porsche Piwis III is the newest Porsche Diagnostic Tool in the market. PIWIS III PST3 can replace Porsche Piwis tester II completely. PIWIS III compare with Piwis II, support Porsche new model after 2018. Most client request for Piwis 3 recently.

Kindly note: Only Porsche Piwis 3 Original in stock now.obd2tool.com have Original Piwis 3 with Panasonic CF-54 installed the Piwis III software ready to use for sale.

PIWIS 3 Porsche VCI3 Porsche PIWIS Tester III with Panasonic CF 54 obd2toolcom PIWIS III Porsche Piwis Tester 3 For Porsche Car Till 2018

Porsche Piwis Tester III Package:

Porsche-Piwis-Tester-III-Package

It covers all new vehicle models up to 2018
1. Current software version: 36.700 (developer mode enabled)
2. Laptop: Panasonic CF-54
3. Update Method: By SD card

Client will get original PIWIS III Porsche VCI3 with the latest software installed on Panasonic CF54 ready to use from obd2tool.com. Piwis Tester III support regular software updates, Piwis III full set come with developer mode option for additional functionality, which support navigation map conversion, unlimited license.

PIWIS TESTER III VEHICLE COVERAGE UP TO 2018:
1. 911
2. Cayenne
3. Macan
4. Boxster/Cayman
5. Panamera
Piwis III Porsche PST3 can read trouble code, clear trouble code, shows ECU information. It test live data, display actual values, and programs. On all; process malfunction navigation, showing all interior circuit diagram. Especially if Porsche were produced after 2005. The PIWIS III has original oscillometer and multi-meter Function. It is the absolutely necessary tool for the job.
PIWIS Tester III Porsche PIWIS III Software 2 PIWIS III Porsche Piwis Tester 3 For Porsche Car Till 2018

Porsche-Piwis-Tester-III-Language

PIWIS3 with Panasonic CF-54 full support Porsche car diagnostic and programming, Piwis III ‘s latest Porsche scanner is only one PIWIS Tester work for Porsche Car after 2017. Piwis III replace Porsche Piwis2 for Porsche new models.


:: برچسب‌ها: PIWIS III ,
:: بازدید از این مطلب : 359
|
امتیاز مطلب : 3
|
تعداد امتیازدهندگان : 1
|
مجموع امتیاز : 1
تاریخ انتشار : یک شنبه 24 شهريور 1398 | نظرات ()
نوشته شده توسط : lily

Mercedes-Benz Scanner MB-Star Diagnostic allows you to read and erase fault codes from any control unit in your Mercedes-Benz. With Star Diagnostic scanner you can read the actual configurations in each system, stream real time sensor data, activate sensors and perform SCN online, SCN offline coding and programing.

This scanner is used by the dealer and it allow you to access and troubleshoot any system or control system in your Mercedes-Benz. Activate any sensor in the car, perform initiation test, stream live sensor data and also read and clear fault codes. If you own a shop who focuses on Mercedes-Benz cars then this is a must for you. Get it via official channels so that you can perform online SCN coding. All MB SD control units are accessible, like engine ECU, ABS, Airbags, SRS, Aircon, Immobilizer, Keyless Entry and the rest of 40+ control units used in MB cars. You can Read / Delete Faults, Live Data, perform sensor actuation, read current configuration, initialaztion and a lot more.

If you are looking to purchase a Star Diagnostic System with Xentry for Mercedes-Benz there are a few things you need to consider.

Learning Curve: In order to use the diagnostic scanner properly you need to learn how to use the Xentry software. While reading, clearing fault codes is not very difficult anything besides that requires that you have proper training. Yes, you can find a few guides online on how to perform certain programming using Xentry but if you don’t perform the programming accurately you may end up causing more problem than you solve.

Consider Genuine Scanner: The only problem is that they are quite expensive and require a yearly license. If you are considering to buy a clone of the scanner made in China keep the following concerns in mind.

SCN Online Coding: Unless you buy the scanner from the official Mercedes-Benz source, you will not be able to perform SCN coding of control units. That’s because Mercedes Star Diagnostic scanner will try to connect to Mercedes-Benz database for verification of SCN code in order to program certain control units. That is not possible unless you have purchased a valid license. With that said there may be some basic coding and programming of control units that can be done but this programing can also be performed with other advanced scanners.

Mercedes Star Diagnostic Problems with Software (Xentry) VM Ware Installation: All the setups that you see for sale that state that they use VMware environments are not legitimate hardware and software. Besides the fact that these scanners are not legal copies, they are also prone to crashing and run much slower than direct Windows installations. Yes, you are required to have a Windows XP with a serial port for the MB Star Diag C3 scanner. Many VMWare Mercedes Star Setups experience problems some of which you can see posted on this site: MB SD C4 C3 problems and solutions.

License: In order to get the full features offered by Mercedes Star diagnostic Software you need to sigh up for a yearly subscription and pay a license fee. This is not financially feasible if you only work on one or two Mercedes-Benz models. If you end up buying a cloned version of the scanner the Xentry software key will expire in a few years and you will not be able to use your scanner at all.


:: برچسب‌ها: MB SD C4 Star Diagnostic Tool, MB SD Connect C4, Mb Star C3, MB Star C4 SD Connect, MB Star Diagnosis C4, Mercedes Benz Star diagnosis C3, Mercedes Star C3 Diagnostic Tools, SDconnect C4, Star C4 ,
:: بازدید از این مطلب : 417
|
امتیاز مطلب : 9
|
تعداد امتیازدهندگان : 2
|
مجموع امتیاز : 2
تاریخ انتشار : پنج شنبه 7 شهريور 1398 | نظرات ()
نوشته شده توسط : lily

CAS 4+ anti-theft auto keys are all lost, need to be read to configure the key, read CAS 4+ anti-theft data and engine computer data, to load data distribution keys.


1.Reading CAS 4+ anti-theft data with CG-Pro S912

CAS 4+ anti-theft computer module style

1

CAS 4+ anti-theft computer module

2

Software physical wiring diagram

3

Physical connection

4

Connect the CG-Pro

5

Decrypt successfully and save the data

6


2.Read engine ECU data with CG-100

Note: CG-100 full-featured support

Click “ECU”

7

Click on the engine model option to enter the current vehicle

8

According to the software physical wiring diagram wiring

9

Engine module wiring

10

Click “Read EEPROM”

11

Read successfully and save the data

12

Show ISN and VIN

13


3.Match the new key with CGDI Prog

Click on the “CAS4 key match”

14

Load CAS 4+ data read by CG-Pro

15

Select data and click open

16

Display relevant information

17

Select the key position that needs to be configured, click to generate the dealer key, and click on the engine data to determine the next step

18

Choose the engine data with CG-100

19

Blank key

20

New key programming success

21

After learning, it can be used normally

22


:: برچسب‌ها: CGDI Prog Mercedes Benz key programmer,CGMB PROG,XCGDI MB Programmer, ,
:: بازدید از این مطلب : 356
|
امتیاز مطلب : 5
|
تعداد امتیازدهندگان : 1
|
مجموع امتیاز : 1
تاریخ انتشار : شنبه 26 مرداد 1398 | نظرات ()
نوشته شده توسط : lily

JMD OBD adapter for handy baby ii key copy machine soon release VAG MQB odometer correction.

JMD OBD VW Audi Skoda MQB Vehicle list

Note:

MQB function requires JMD OBD adapter. The adapter only works with JMD Handy Baby II.

Handy baby ii cannot do MQB all keys lost.

Handy baby 2 OBD does not support JCI dashboard offline programming, always do it online. Online need extra token.  Offline programming does not require token.

After you get the OBD,send us your OBD ID to open the MQB function.

JMD OBD Adapter Function:

All JMD Assistant function
OBD Programming
Automobile diagnosis
Odometer correction
Remote control manual programming
VW/Skoda/Audi MQB

jmd-obd-function

MQB token list
1. Magotan MQB
2. Golf 7 MQB
3. Lamando MQB
4. Skoda Octavia MQB
5. Tango MQB
6. VW Touran MQB
7. Passat pre-2019 MQB all keys lost
8. Audi A3 MQB
9. Audi TT MQB

jmd-obd-token-1
JMD OBD vs. old JMD Assistant

jmd-obd-vs-jmd-assistant

JMD OBD Diagnostic Car List
VW
Audi
Honda
Toyota
Nissan
Citroen
Suzuki
Buick
Chevrolet
Ford
Mazda
Dongfeng Aeolus
Haima
JMC
Brilliance auto
Chery
Southeast
Mitsubishi
Great Wall
Geely
Englon
JAC
Changhe
BYD
MG
LIFAN
ZOTYE
SGMW
LOTUS
HAFEI
ZXAUTO
CHANGFENG
Land Rover
Renault
Dodge
Subaru
Jeep
BMW
Benz
Ssangyong

Opel
Jaguar
Lincoln

JMD OBD Remote Programming Car List
VW
Audi
Buick
Chevrolet
Cadillac
Kia
Hyundai
Roewe
Ssangyong
Renault
Porsche
Ford
Nissan
Infiniti
Smart
Land rover
Skoda
Mazda
Great Wall
FAW BESTURN
Geely
GMC
Jeep
Chrysler
Jaguar
Dodge

JMD OBD IMMO programming car list
VW
Audi
Hyundai
Buick
Chevrolet
Honda
JINBEI
Brilliance Auto
Citroen
Peugeot
Dongfeng Nissan
Kia
DFL-FX
Toyota
TJFAW
Southeast
Chery
ZZNissan
Mazda
Leopaard
Ford
Changan
Changhe
Ceely
HAFEI
JAC
JIANGLING
Great Wall
HAWTAI
MAPLE
LIFAN
ZOTYE
FAW BESTURN
YOUNG LOTUS
SAIC ROEWE
HAIMA
SAIC MG
Chrysler
Renault
Subaru
Jaguar
Cadillac
Land rover
Lexus
Mitsubishi
Infiniti
Ssangyong
Jeep
Dodge
BYD
Smart
Luxgen
Baojun
Beijing Auto
Fiat
Trumpchi
Yema
FAW JIABAO
GMC
Hummer
Iveco
Maserati
Suzuki
Isuzu
DS


:: برچسب‌ها: JMD Handy Baby II,Handy Baby 2,Handy Baby 2 Key Programmer,Handy-baby II, ,
:: بازدید از این مطلب : 372
|
امتیاز مطلب : 0
|
تعداد امتیازدهندگان : 0
|
مجموع امتیاز : 0
تاریخ انتشار : پنج شنبه 10 مرداد 1398 | نظرات ()
نوشته شده توسط : lily

This post show a guide on how to install Porsche PIWIS 18.100 universal image on your laptop.

Getaibose made some modifications:
* Win XP tweaks (enable right click on taskbar, enabled win xp start menu etc)
* Win XP activated (no more 3 days left to activate errors)
* Uninstalled all Panasonic drivers and other drivers not critical to the system
* Deleted un-necessary files
* Windows XP fully updated from Windows Update
* Uninstalled POSES and PET (to make download smaller, can re-install them if you wish – refer folder “Hardlock fix for installing PET and POSES”)
* changed adobe reader from German to English
* Updated WinRAR
* 100% defragmented image
* Made into universal image (can restore to VM or any laptop compatible with Windows XP)
* Restored Size ~ 17.9 GB (this is excluding pagefile storage)

NOTE: Even though the PIWIS version is shown as 18.150.500, this might only be a 18.100 as some experts have debunked the existance of 18.150.500 and stated that in this image simply registry edited to display the version as 18.150.500 (refer file “18.150.500 is fake”)

Porsche PIWIS II Universal Image Download:

https://mega.nz/#F!XvhhTQpb!qzZn4vSeYeFx8K13SZLAWQ

Porsche PIWIS II Universal Image Installation:

If you are restoring the PIWIS image to a laptop,use software like RUFUS to make the restore program ISO file to a bootable USB thumb drive.

If you are restoring to a virtual machine,simply mount the iso on the virtual machine.

How-to-Install-Restore-Porsche-PIWIS-18.100-Universal-Image-1

If the screen gets stuck at this command prompt,simply close the prompt

How-to-Install-Restore-Porsche-PIWIS-18.100-Universal-Image-2

Click restore and then click the path button.Select the backup file(adi.file) and click on next.

How-to-Install-Restore-Porsche-PIWIS-18.100-Universal-Image-3

The program detects the selected backup is  a system image,would you like to do a system restore?

Click “Yes”

How-to-Install-Restore-Porsche-PIWIS-18.100-Universal-Image-4

Make sure this box is checked
How-to-Install-Restore-Porsche-PIWIS-18.100-Universal-Image-5

Select the drive into which you want to restore the image and click next

How-to-Install-Restore-Porsche-PIWIS-18.100-Universal-Image-6

Make sure that the “enable universal restore” box is checked,so that the system can boot on your laptop.

If you are restoring the image to a virtual machine,you can leave this option unchecked.

How-to-Install-Restore-Porsche-PIWIS-18.100-Universal-Image-6

Make sure that on unallocated space remains at the end of the partition

Next,click “OK” and then click “Start Restore”

After restoring and booting into the system,install drivers and imprint the texter with the method of your choosing.Turbofans method can be found in the following folder.

How-to-Install-Restore-Porsche-PIWIS-18.100-Universal-Image-8

Restore Porsche PIWIS II Universal Image to VM:

Create two virtual hard drives – lets say – VHD-A and VHD-B;VHD-A will be the main VHD of your VM into which you are restoring the image.
VHD-B is just a temporary VHD to hold the image file for restore

2. Copy the image file (.adi file) into VHD-B
3. Attach both VHD-A and VHD-B to the VM
4. In the VMs CD drive, mount the recovery disc iso
5. Start the VM and boot into the recovery CD
6. Follow the instructions given in the archive to restore the image
7. After image finish restoring, turn off the VM and detach VHD-B and unmount the recovery disc iso from the VM
8. Start the VM – after it finish initializing, install guest additions.
9. Done – you can delete VHD-B from your system

Theoretically this image should be able to restore and boot into any laptop which supports Windows XP (hopefully no BSOD on booting). Also you can restore it to a Virtual Machine

My aim with this image was to create an PIWIS image that anyone can restore and use without any difficulty.
This image might be more suited to someone restoring it to a laptop other than a Panasonic CF-30 as I have removed all the Panasonic drivers. You can restore it to a CF-30, just need to reinstall / restore all the drivers

Easiest method to re-install drivers – In the laptop you are planning to restore the image -> If you are already running Win XP in that laptop, use software called “Double Driver” to backup all the drivers. After restoring the Porsche Piwis2 image, restore the drivers – hardly take 5-10 min for complete driver restore and it’s all one-click operation.


If you to get Best Price Porsche Piwis Tester II,please Connect us: sales@obd2tool.com


:: برچسب‌ها: Porsche Piwis 2,piwis 2,piwis tester 2, ,
:: بازدید از این مطلب : 519
|
امتیاز مطلب : 2
|
تعداد امتیازدهندگان : 1
|
مجموع امتیاز : 1
تاریخ انتشار : دو شنبه 31 تير 1398 | نظرات ()
نوشته شده توسط : lily

Current Totals on Caterpillar ET Software

Current-Totals-on-Caterpillar-ET-Software

-Connect Caterpillar ET Software,
-Information – Current Totals,

Current Totals:
-Total Operating Hours (hours)
-Total Idle Time (hours)
-Total Fuel (Gal)
-Total Idle Fuel (Gal)
-Total Max Fuel (Gal)
-Average Load Factor (%)


:: برچسب‌ها: Caterpillar ET Software,CAT ET Software ,
:: بازدید از این مطلب : 426
|
امتیاز مطلب : 6
|
تعداد امتیازدهندگان : 2
|
مجموع امتیاز : 2
تاریخ انتشار : پنج شنبه 13 تير 1398 | نظرات ()
نوشته شده توسط : lily

Step by step procedure on how to install SDD V157 on Win7 for Jaguar Land rover diagnosis. SDD V157 can access to chassis, power train, electrical, body etc. systems by working together with JLR VCI.

STC SVCI DoIP with SDD V157 features:
1.Can connect network connection.
2.Easy to install.
3.Multiple language available
4.Auto VIN read
5.Can perform Service functions.

Right click on “SDD_157_Full” and choose “Run as administrator.

STC SVCI DoIP with SDD V157 features:
1.Can connect network connection.
2.Easy to install.
3.Multiple language available
4.Auto VIN read
5.Can perform Service functions.

Right click on “SDD_157_Full” and choose “Run as administrator.

SDD-V157-win7-installation-for-Jaguar-Landrover-1

Choose Language:
Chinese (simplified),
Dutch
English (United States)
French (standard)
German
Italian
Japanese
Korean
Portuguese (Brazilian)
Portuguese (Standard)
Russian
Spanish

SDD-V157-win7-installation-for-Jaguar-Landrover-2

Click on “Next” to go on…
SDD 157 install requires the newest Adobe Reader, click “OK” to update.

SDD-V157-win7-installation-for-Jaguar-Landrover-3

Installing JLR_IDS_INSTALL_TOOLS.
It pops up “Would you like ActiveCGM to be the default TIF viewer?
Click on “No”.
SDD-V157-win7-installation-for-Jaguar-Landrover-4
SDD-V157-win7-installation-for-Jaguar-Landrover-5

Click on “HV Safety” to setup.

SDD-V157-win7-installation-for-Jaguar-Landrover-6
SDD-V157-win7-installation-for-Jaguar-Landrover-7
SDD-V157-win7-installation-for-Jaguar-Landrover-8

SDD is configuring your new software installation.

SDD-V157-win7-installation-for-Jaguar-Landrover-9
SDD-V157-win7-installation-for-Jaguar-Landrover-10

Install MOXA UPort 1110/1130/1150 Windows Driver Ver1.6 on your computer.
Click “Next”, then “Install”, then complete.

SDD-V157-win7-installation-for-Jaguar-Landrover-11
SDD-V157-win7-installation-for-Jaguar-Landrover-12

SDD is configuring your new software installation, it will take several minutes.
InstallShield Wizard complete.
Restart the computer.

SDD-V157-win7-installation-for-Jaguar-Landrover-13

Back to DVD, right click on “SVCI DoIP D-PDU and Passthru Driver Set…”
Choose “Run as administrator”.

SDD-V157-win7-installation-for-Jaguar-Landrover-14

Select Language (English and Chinese only)

SDD-V157-win7-installation-for-Jaguar-Landrover-15

Click on “Next”;
Click on “Next”;
Click on “Next”;
Click on “Install”;
Click on “Finish”, complete the SVCI D-PDU and Passthru Driver Setup Wizard.
SDD-V157-win7-installation-for-Jaguar-Landrover-16
SDD-V157-win7-installation-for-Jaguar-Landrover-17
Plug SVCI DoIP cable into the computer, wait until the device is ready to use.
SDD-V157-win7-installation-for-Jaguar-Landrover-18
SDD-V157-win7-installation-for-Jaguar-Landrover-19

Right click on “Computer” – “Manage” – “Device Manager” and if you can see “COM5” , that means SVCI DoIP cable has established a good communication with the computer.

SDD-V157-win7-installation-for-Jaguar-Landrover-20

Right click on “JLR SDD” and choose “Run as administrator“.

Launching SDD.
SDD-V157-win7-installation-for-Jaguar-Landrover-21

Continue.

SDD-V157-win7-installation-for-Jaguar-Landrover-22

Continue (SVCI DoIP cable is allowed to connect network connection)

SDD-V157-win7-installation-for-Jaguar-Landrover-23

Enter dealer information.
SDD-V157-win7-installation-for-Jaguar-Landrover-24

Click on “Continue“, you can notice “Device Connected“.

SDD-V157-win7-installation-for-Jaguar-Landrover-25

Click on “AutoVIN Read“.

SDD-V157-win7-installation-for-Jaguar-Landrover-26

High line instrument cluster.
SDD-V157-win7-installation-for-Jaguar-Landrover-27

Click on “Diagnosis“.

SDD-V157-win7-installation-for-Jaguar-Landrover-28

Choose “System” (SVCI DoIP can access to Land Rover L319 Chassis, Powertrain, Electrical, Body etc).

SDD-V157-win7-installation-for-Jaguar-Landrover-29

View DTCs for PCM module.
SDD-V157-win7-installation-for-Jaguar-Landrover-30
SDD-V157-win7-installation-for-Jaguar-Landrover-31

Market specification.

SDD-V157-win7-installation-for-Jaguar-Landrover-32

Loading recommended Candidates.

SDD-V157-win7-installation-for-Jaguar-Landrover-33

DTCs by ECU.
SDD-V157-win7-installation-for-Jaguar-Landrover-34

As you can see SVCI DoIP JLR can also perform service Functions.
To be continued….

Enjoy


:: برچسب‌ها: SVCI JLR DoIP SDD,SVCI DoIP,SVCI JLR DoIP SDD Pathfinder Diagnostic Tool,STC SVCI DoIP, ,
:: بازدید از این مطلب : 366
|
امتیاز مطلب : 5
|
تعداد امتیازدهندگان : 1
|
مجموع امتیاز : 1
تاریخ انتشار : پنج شنبه 30 خرداد 1398 | نظرات ()